


Online learning requires a lot more independence from learners. In the classroom, instructors hand out materials and provide content right when learners need it, manage class time, and facilitate assessment. Learners are expected to engage and participate in the learning, not in the management of the learning experience.
When we move to online learning, a common error is to provide materials without sufficient structure and guidance for how learners use it. When learners need to “hunt” for material, figure out how it works together, spend time organizing, etc., this deducts from the cognitive and time resources that they would otherwise use to engage in learning the content and skills intended. Collectively, these skills and others like them are known as “executive function” (EF) skills.
What about teaching self-organization skills? Don’t we want to avoid “spoon-feeding?”
Teaching EF skills such as organization and time management is really valuable! However, most of us struggle with trying to learn EF skills while simultaneously being expected to use those EF skills to learn Math, Science, Literature, or History. Think of it like “texting and driving”… split attention doesn’t end well.
The idea here is to focus learners on a skill or content, just like a science experiment would isolate a variable. In practice, instructors could take some time to make learning EF skills the learning objective (without an additional content objective), and once students master the EF skills required, then expect them to use them to learn content or other skills.
However, if instructors don’t have time to explicitly teach EF skills, then they should be scaffolded such that learners are able to keep their focus on the content or skills explicitly being taught in the class.
Why Modules?
One of the best tools in the online teacher’s toolbox to support executive function (EF) skills is to use good learning Module design in a learning management system (LMS), such as Canvas (which will be my focus here). A Module gives the instructor the capacity to organize materials in a linear fashion, with clear directions and structures baked in.
Consider this hypothetical example of a day’s lesson in Module view (note: you can get this module, populated with demo content and with bonus icons and headers from the link in the resources at the end of this blog entry).
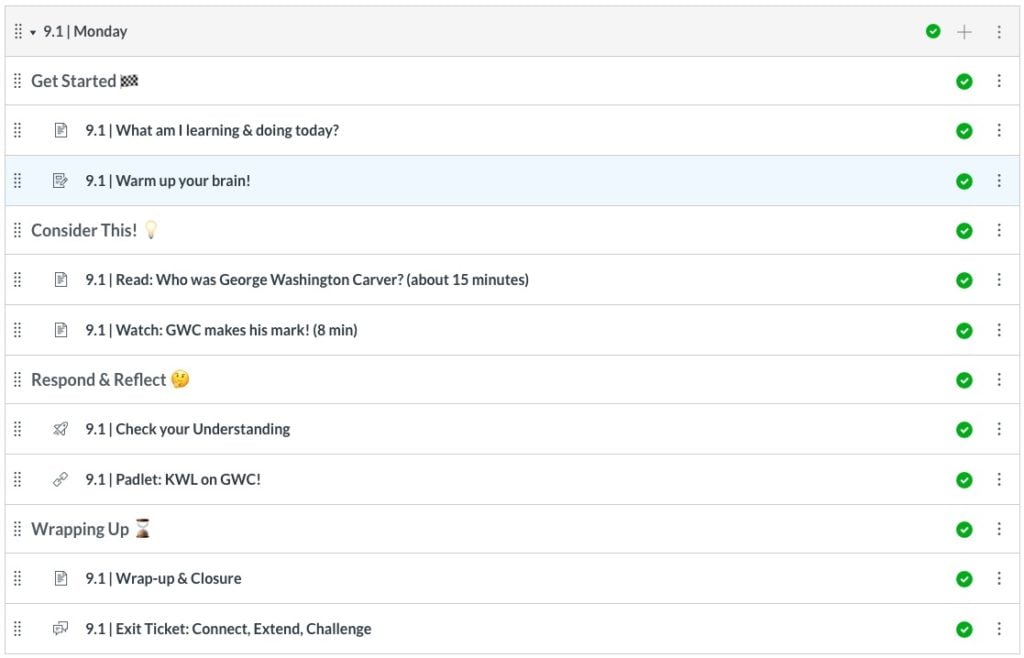
In this example, it is unlikely that learners would get lost or confused in the day’s lesson, which is not only organized visually & spatially in the module design, but also explained in the first page of the module “What am I learning & doing today?”.
Modules are a way for instructors to do the work of organizing and managing content and time such that learners can focus on learning
Compare this, for example, to a course design in which learners are expected to dig through Canvas “files” or across “pages,” “assignments,” and “discussions” tabs to find what is expected of them on a given day. Modules is how learning is intended to be facilitated in Canvas, and all of Canvas’ features are optimized when Modules are centralized. Modules are a way for instructors to do the work of organizing and managing content and time such that learners can focus on learning.
How to Make an Effective Module
Good module design, as with any other type of design, occurs in a design process or design cycle, like this one:
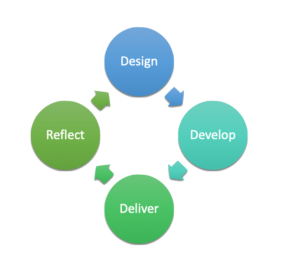
We design what the learning experience will be, then we “physically” develop it, it is delivered to the learners, and we reflect to inform future designs. Let’s look at each step.
Design
This step doesn’t involve putting anything on Canvas yet. You are just planning your approach.
The first choice you need to make regards the scope of a module. Is a module going to be a topic? A day? A week? A unit? In general, modules should be kept short and focused. I almost always recommend a module for a week for higher education and a module for a day/lesson in K-12.
Next, you’ll need to think about the content for that module. To do so, it helps to apply backward design:
- What do I want the learners to know or be able to do at the end of the module (day, lesson, topic, week)? (Objective)
- How will they show me that they are progressing or have mastered the knowledge or skill? (Assessment)
- How can I support them in getting there? (Materials & Activities)
Many instructors know of backward design, but get so focused on putting materials in the online setting that they forget to use it. It is just as important if not more important to backward design for online learning as it is in the classroom!
Develop
If you don’t yet know how to “physically” make a module in Canvas, check out these Canvas Community articles on the topic.
As you develop the material in Canvas, a goal is to make a module that serves as a template that you can duplicate for each new module (lesson/day/week) and simply re-populate with new content. This is critical to keeping a consistent experience for the learners. Some variation will inevitably occur when you have weeks that have exams or other special events, but by-and-large, the look and feel should stay consistent. Keep this in mind as you develop the first module… you aren’t just making a module, you’re making a prototype!
In my example, I am focusing a module as a day/lesson, but these principles will apply to other module design scopes as well. In general, a module (like a story) should have a beginning, a middle, and an end.
Beginning: An Overview
- Learning Outcomes
- Overview of what they’ll do (with time estimates, if possible)
Middle: The Content of the Lesson (note: these don’t have to be in this order, and can be cyclical within a lesson)
- Materials for the students to consume (to give material)
- Readings
- Audio/video
- Images and interactive content
- Opportunities to respond (to mark progress, engage, and get help)
- Formative assessments (discussions, low-stakes quizzes, KWL charts, journals, etc…)
- Q&A forums
- Synchronous discussions if possible
End: Summative Assessment & Conclusion
- Summative Assessment (to show mastery)
- Practical demonstration
- Quiz/Test
- Project work
- Instructor reflection on what learners learned, what’s coming next.
Be sure to set due dates for all tasks and consider adding “available from/until” dates if desired. Consider setting up requirements for the module (including forcing learners to move through in sequential order), use text headers to separate parts of the lesson, use indentations for visual organization, and feel free to use emoticons sparingly (you can use any of the emojis from emojipedia as if they were text, even in the module text headers).
Spend time really developing this module to look and feel and function as best as you can. Remember, you will be literally duplicating it, so the time will be well spent.
Deliver
In an asynchronous learning experience, the bulk of the instructor’s effort is put into preparation (design & development), which reduces the emphasis on delivery (as opposed to a synchronous and/or face-to-face class in which delivery takes a significant portion of the instructor’s time and energy).
Nevertheless, it is important to make sure you are available to support learners if they need it during the delivery window. Here are some ways to do so:
- Make sure learners know how to contact you if they need help. Be as responsive as you can.
- Check in on their formative assessment submissions and give feedback as soon as you’re able to help address errors before they are compounded. (For subjects that can have some auto-grading, this is a good option, too).
- If you have discussion boards, participate a few times if you’re able. Students need to see the instructor as being “present.”
Reflect
Don’t skip this step!
Schedule some time (even 5-10 minutes) to reflect on how the lesson went, how your learners performed, where there appeared to be confusion or problems. Use this to feed into improvements on a rolling basis.
You can also have little daily or weekly “check ins” with surveys in which students (anonymously or not) can express their feelings about what’s going well, what they feel they need, etc. This can be very valuable and also show the learners that you really do care about their experience.
Duplicating Prototypes
Once you have a solid prototype, duplicate it! You can then rename items and edit content, but keep the look, feel, and structures the same. This will save you a ton of time, and will provide your learners with a consistent learning experience.
It’s okay if you have some modules that vary a little bit, but try your best to keep the structures of each module the same. This will pay dividends in reduced confusion, etc. from your learners.
Continue your learning. Explore on-demand and facilitated course options.
This post was previously posted on Innospire Education.
Dr. Eric Moore is the Universal Design for Learning & Accessibility Specialist + Instructional Designer at the University of Tennessee as well as a practicing educational consultant and author of UDL Navigators in Higher Education: A Field Guide. Contact him directly at DREJMOORE@INNOSPIRE.ORG
